For new or existing customers. The backend is a crucial part as long for integration for the POS system.
Here are the link for the step by step to login to backend: https://crmsystem.warelycorp.com/knowledge-base/article/warelypos-backend-steps-to-login-to-backend-instance
Next, after logging in to your backend. There are some crucial parts to import menu and setup menu on the POS system.
First, in order to make a menu, you will need to keep in mind for these sections, (Products, Categories and Modifiers).
Products > list products
https://crmsystem.warelycorp.com/admin/knowledge_base/view/warelypos-backend-training
List products are able to let you to add products into your backend and show it into the POS. I will include a picture on how to add product by using the list product and how will it shows in the POS.
Below as attached is the picture showing the step by step on how to add product by using list product section and how it shows on the POS.
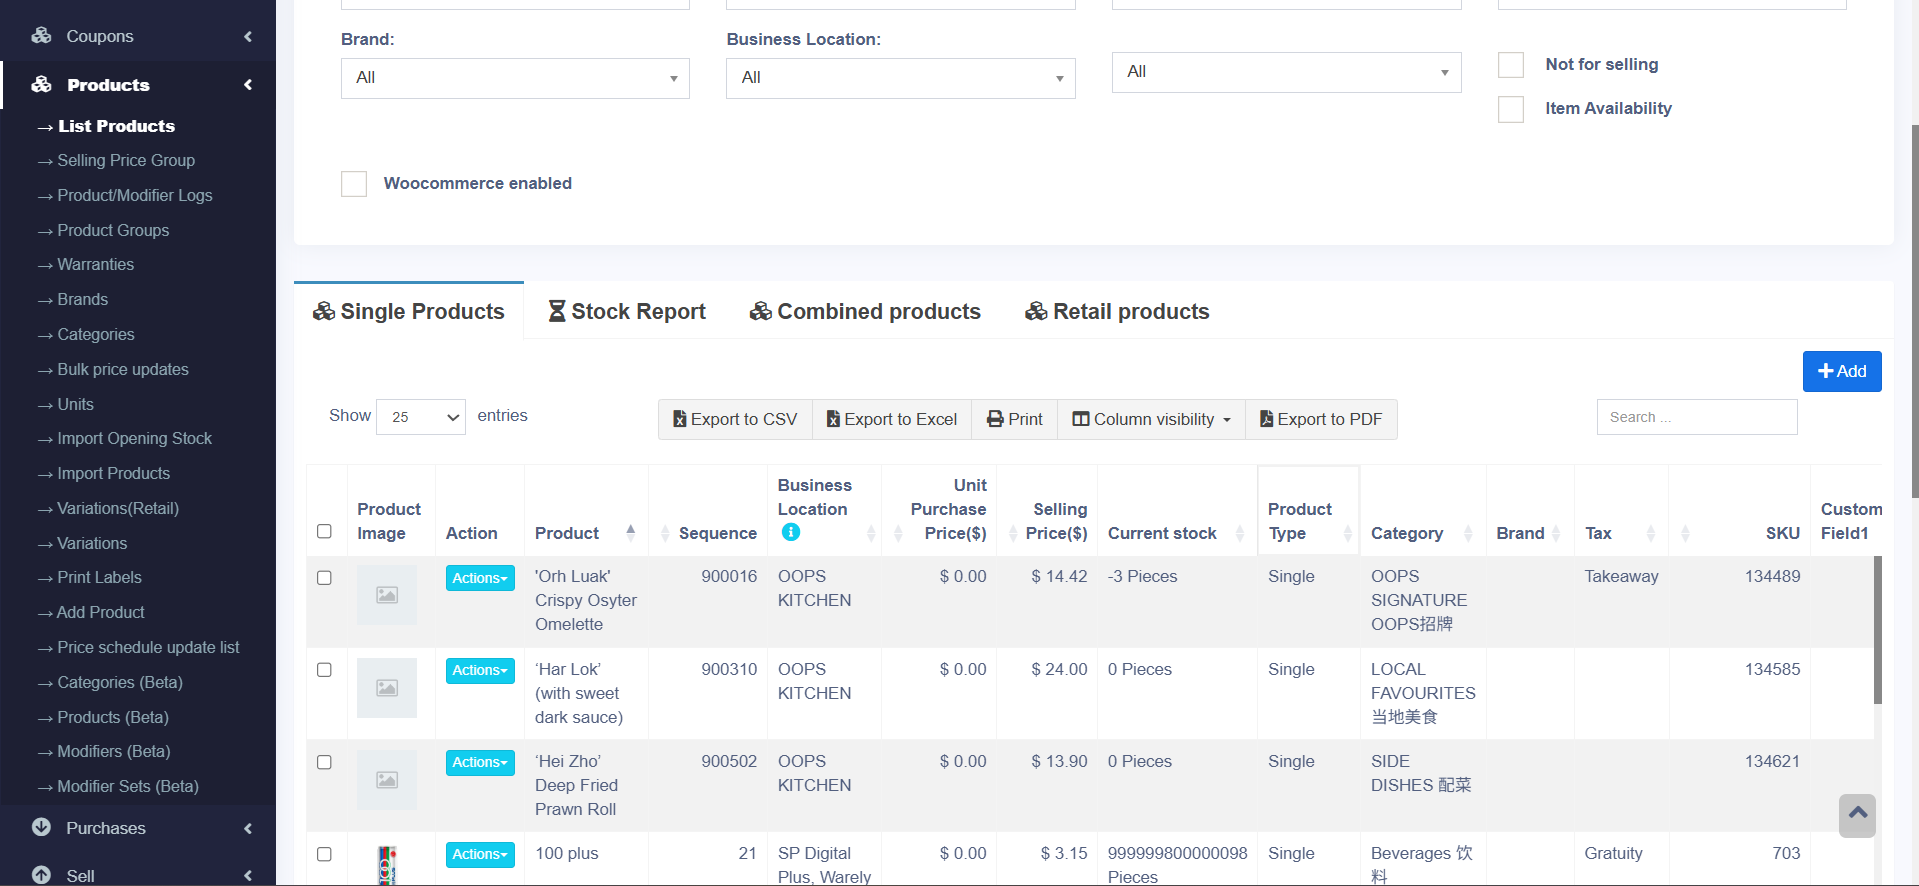
After logging in, at the left panel, you will be able to see "Products" section, click on "Products", then inside, look for "List Products". Click on "List Products" and you will be able to see something like the above picture. Click on the "Add" button.
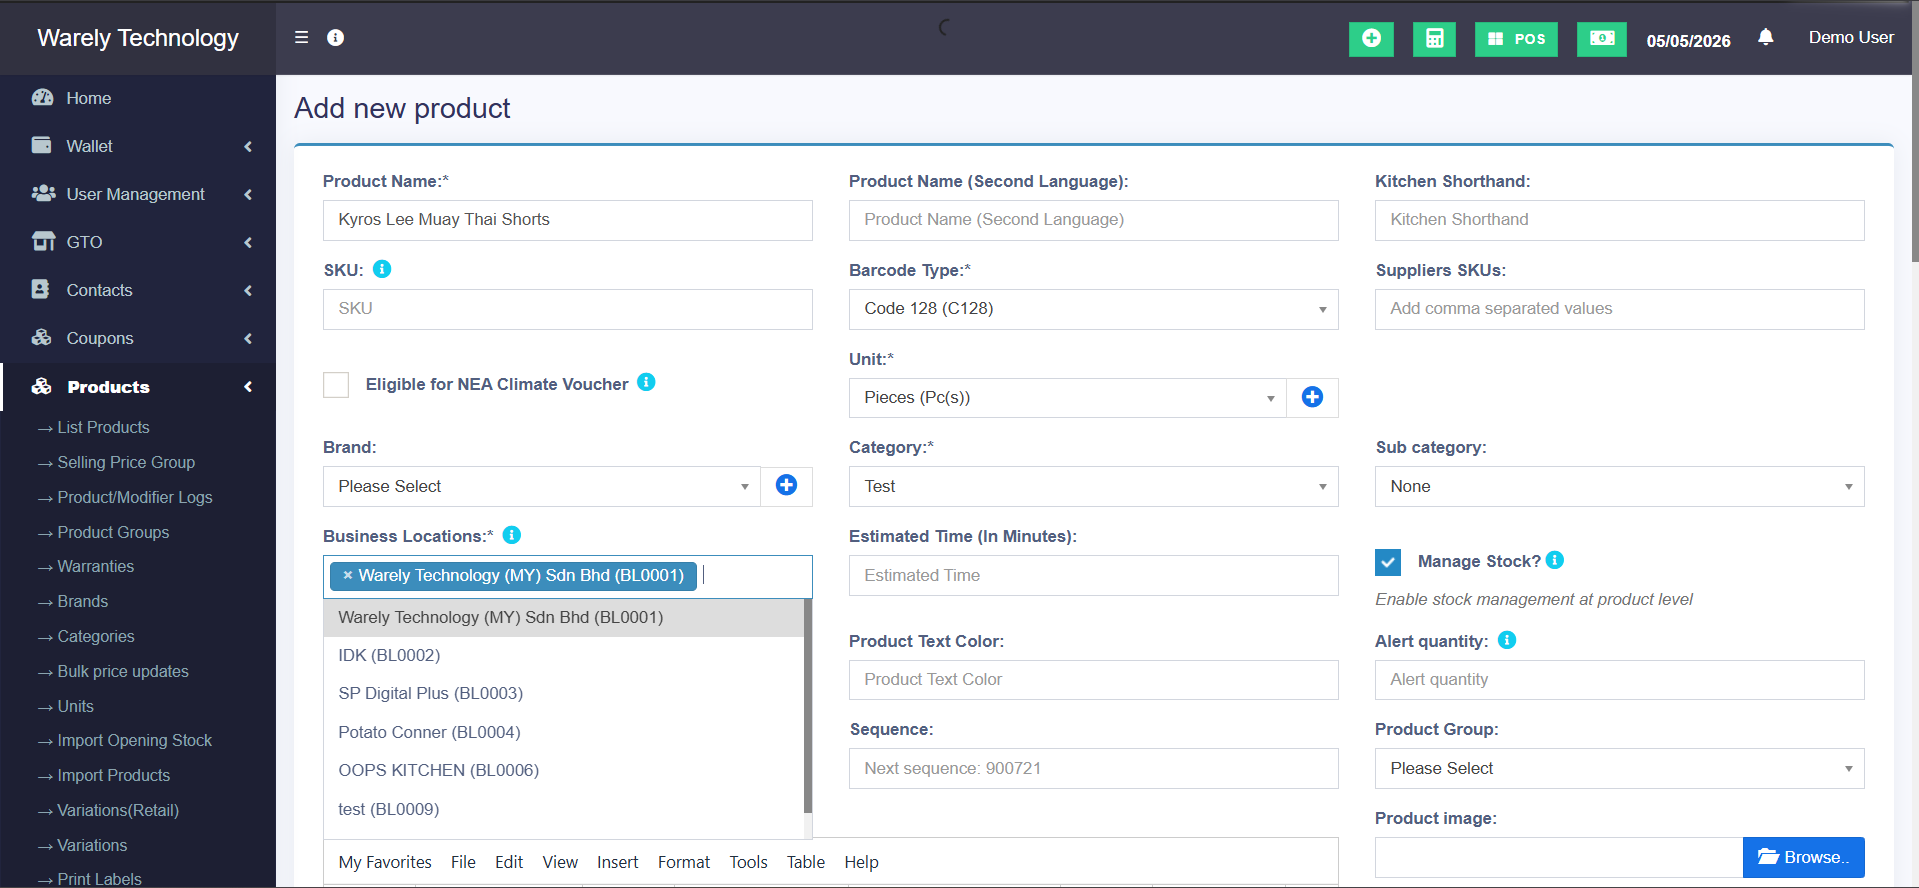
After clicking the "Add" button, you will be redirected to this page, in this page, you can add your products by input things like (e.g. Product name, Category, Unit, Business Locations and Sequence).
Above as attached is adding a product named "Kyros Lee Muay Thai Shorts". Category as Test. Unit as Pc(s). Business location as Warely Technology and Sequence as 900721.
After that, scroll down and you are able to input the price.
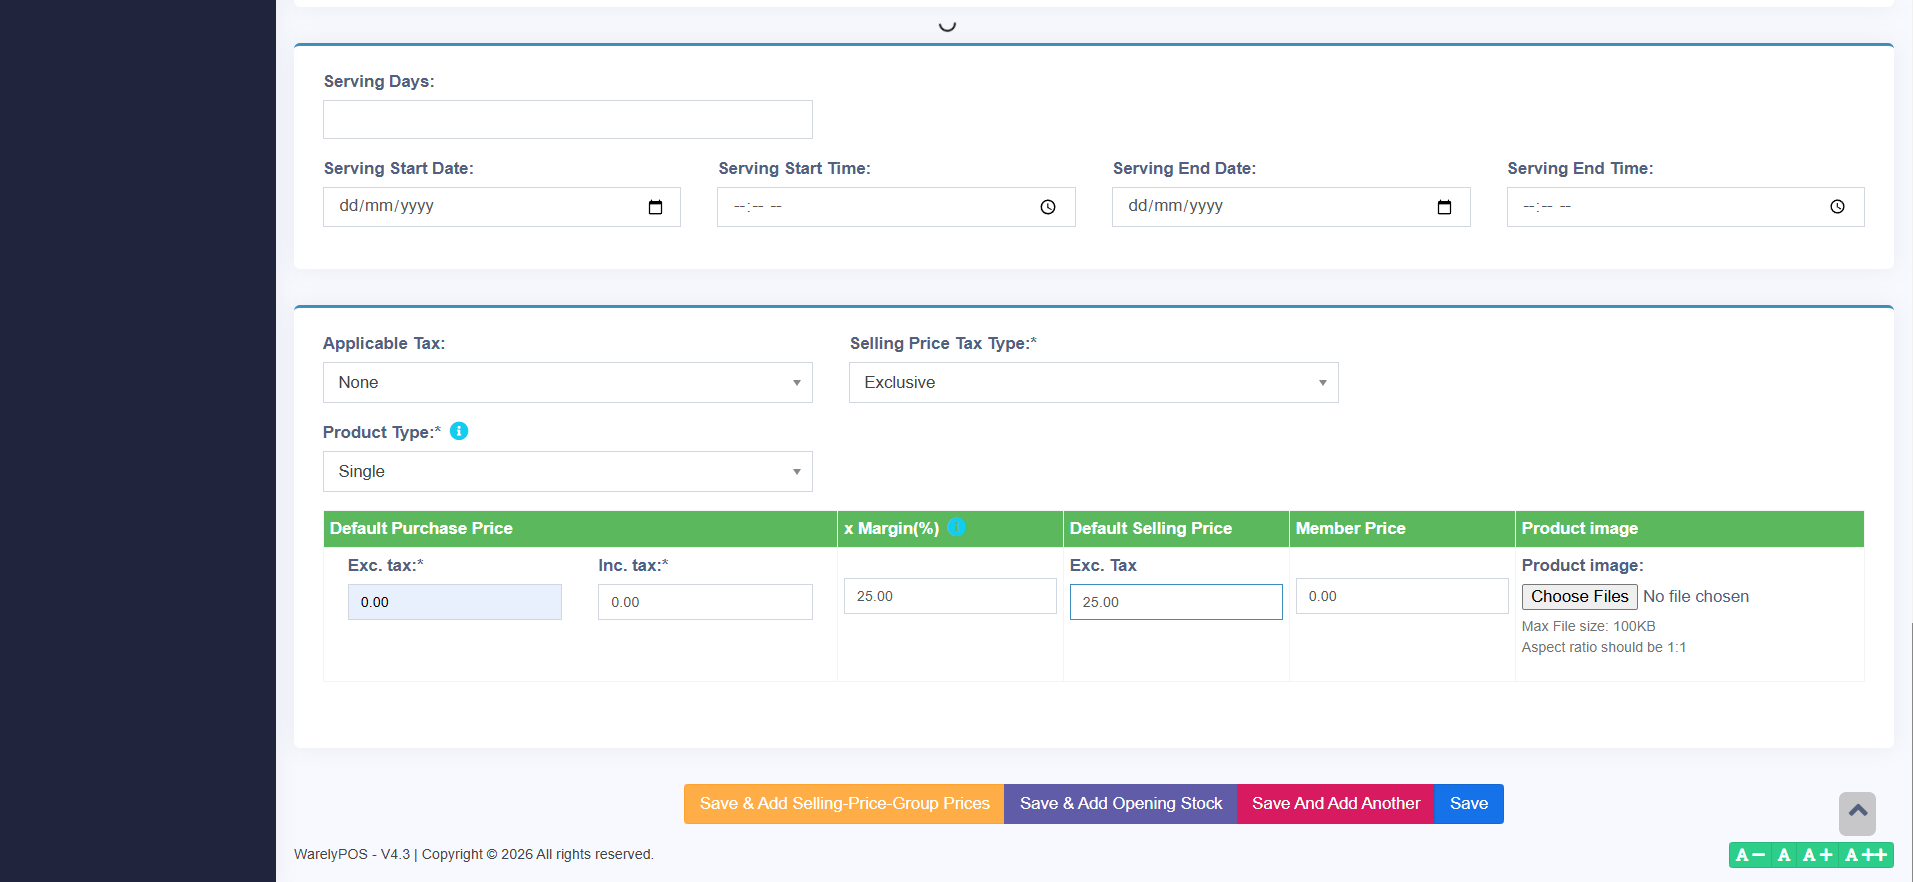
Above as attach is the page that you scroll down to input price. At the "Exc Tax" and "Inc Tax", put 0.00, "Margin" as 25% and set your own price at "Default Selling Price".
After setting your price up, press the "Save" button.
How it shows on the POS:
After adding the product into your backend, your POS will be able to integrate and shows up in the system, i will be showing you how does the specific product shows up on the POS.
Below as attached is a picture on how does the POS shows up the product that you added into the backend.

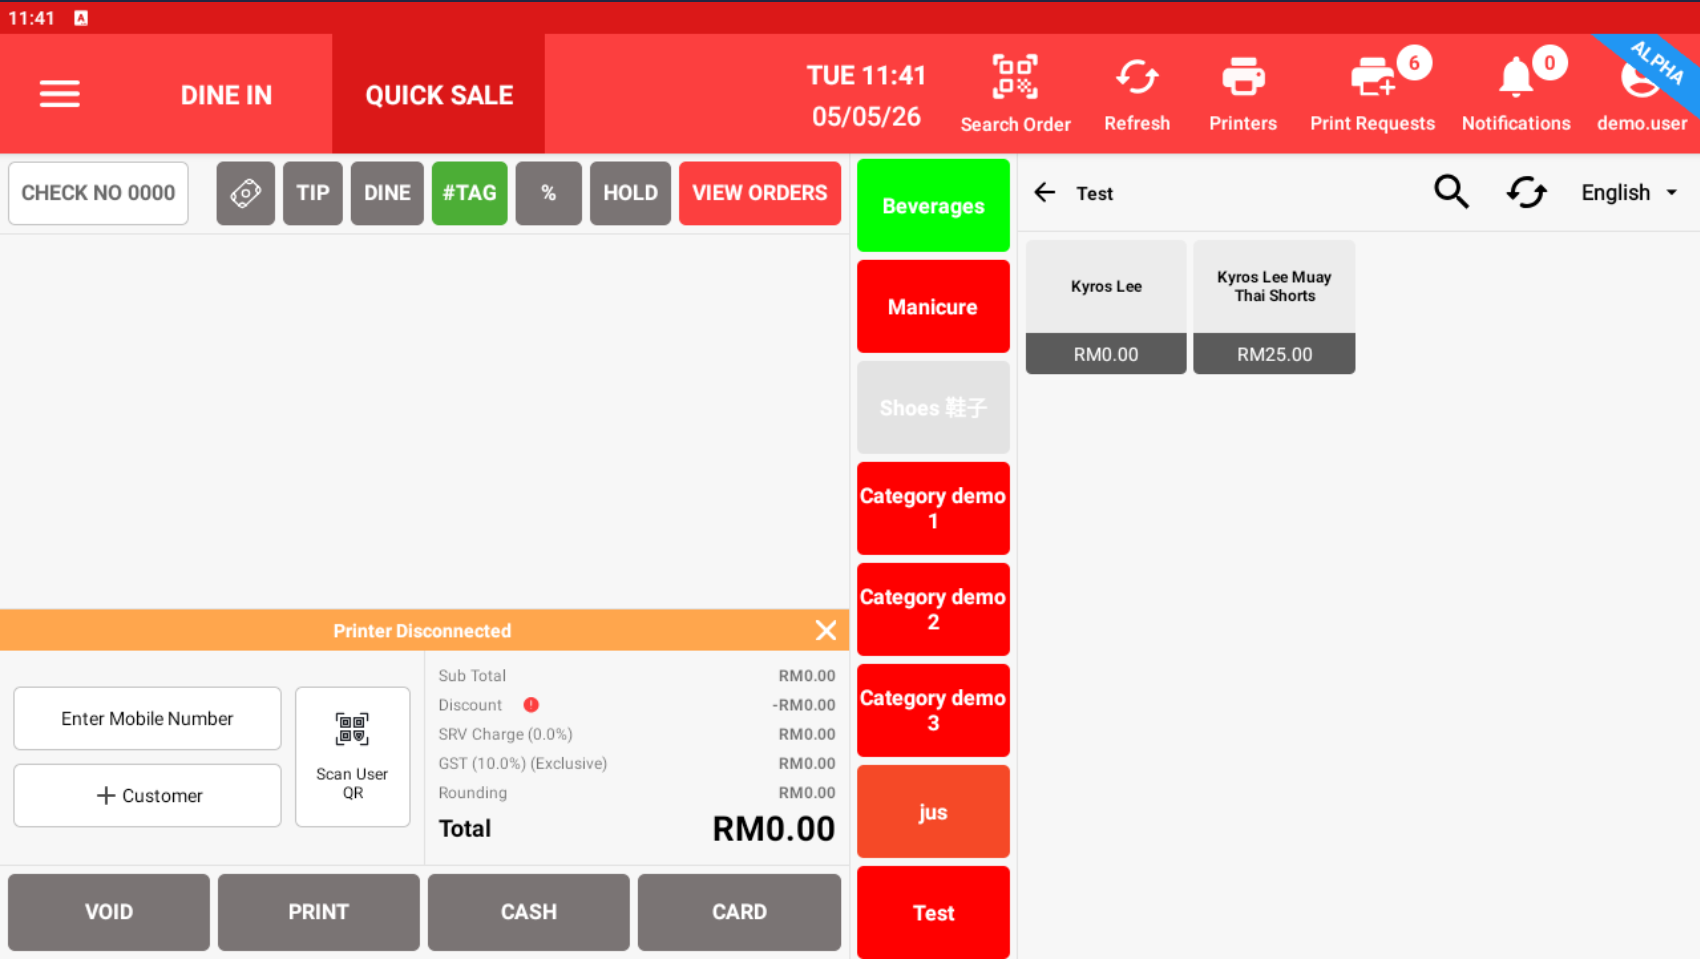
As you can see, the product named "Kyros Lee Muay Thai Shorts" is showing up on the POS after adding in the backend.
NOTE: After adding the products in the backend, kindly REFRESH your POS to ensure the products are added. Kindly press REFRESH by pressing the two arrows button on top.
对于新客户或现有客户,后台系统是非常关键的一部分,尤其是在与 POS 系统进行整合时。
以下是登录后台的分步指南链接:
WarelyPOS 后台登录步骤指南
接下来,在登录后台后,有几个关键部分需要设置,以便导入菜单并在 POS 系统中完成菜单配置。
首先,在创建菜单时,您需要注意以下几个部分:(Products、Categories 和 Modifiers)。
Products > List Products
“List Products” 功能可以让您在后台添加产品,并将其显示在 POS 系统中。我将附上如何使用 “List Products” 添加产品的图片,以及产品在 POS 中的显示效果。
以下附图展示了如何通过 “List Products” 部分一步一步添加产品,以及它在 POS 中的显示方式。
登录后,在左侧面板中,您将能够看到 “Products” 部分。点击 “Products”,然后在里面寻找 “List Products”。点击 “List Products” 后,您将看到类似上图的页面。点击 “Add” 按钮。
在点击 “Add” 按钮后,系统会跳转到此页面。在该页面中,您可以通过填写以下信息来添加产品,例如:
- Product Name(产品名称)
- Category(分类)
- Unit(单位)
- Business Locations(营业地点)
- Sequence(排序编号)
以上示例中,添加的产品名称为 “Kyros Lee Muay Thai Shorts”,Category 为 “Test”,Unit 为 “Pc(s)”,Business Location 为 “Warely Technology”,Sequence 为 “900721”。
完成后,向下滚动页面,您将可以输入价格。
以上附图展示的是向下滚动后输入价格的页面。
在 “Exc Tax” 和 “Inc Tax” 中填写 0.00,
“Margin” 设置为 25%,
然后在 “Default Selling Price” 中设置您自己的售价。
完成价格设置后,点击 “Save” 按钮。
产品在 POS 中的显示方式:
在后台添加产品后,POS 系统将会同步整合并显示该产品。接下来我会向您展示该产品在 POS 中的显示效果。
以下附图展示了您在后台添加的产品如何显示在 POS 系统中。
正如您所看到的,名为 “Kyros Lee Muay Thai Shorts” 的产品,在后台添加后已经成功显示在 POS 系统中。
注意:在后台添加产品后,请务必刷新您的 POS 系统,以确保产品成功同步。
请点击顶部的“双箭头”刷新按钮进行刷新。